
Glow berries are one of Minecraft’s most useful and visually striking food items, and they’ve become a staple for builders and survival players alike since their introduction in the 1.17 Caves & Cliffs update. Whether you’re looking to light up a dark cave network, feed your livestock, or create an ambient lighting setup for your base, glow berries deliver on multiple fronts. The best part? They’re relatively straightforward to find and farm once you know where to look. This guide walks you through everything you need to know about glow berries in 2026, from locating them in the wild to setting up an efficient farm that’ll keep you stocked for the long haul. If you’re serious about optimizing your survival world, glow berries should be on your radar.
Key Takeaways
- Glow berries serve dual purposes in Minecraft: they restore 0.5 hunger points and emit light level 14, making them ideal for both survival sustenance and ambient lighting in cave-like environments.
- Glow berries spawn naturally in lush caves below y-level 0, and you can quickly locate them by exploring deep underground or using the /locate biome minecraft:lush_caves command in Creative mode.
- Setting up a glow berry farm requires water proximity (within 4 blocks horizontally), adequate lighting, and ceiling-mounted cave vine blocks that grow downward—a basic 15×15 chamber with 9 vine columns produces dozens of berries per harvest cycle.
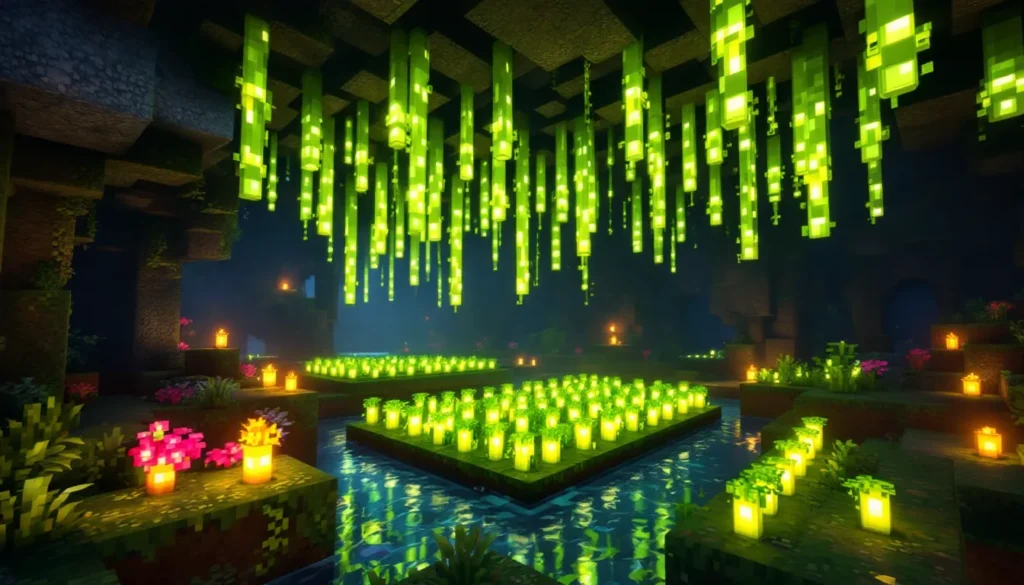
- Unlike other light sources, glow berries combine functional lighting with organic aesthetics, making them superior to torches and lanterns for decorative cave-themed builds while remaining simpler than redstone lamps or glowstone setups.
- Glow berries cannot breed animals and restore modest hunger compared to cooked meat, but their ease of farming and renewable supply make them valuable for early-game survival and long expeditions where torch crafting becomes unnecessary.
What Are Glow Berries in Minecraft?
Glow berries are a unique food item that serves double duty: they restore hunger and emit light. Each glow berry restores 0.5 hunger points (a quarter of a meat item), making them modest in terms of nutrition, but their real value lies in their lighting properties. When placed on a cave vine, they emit a light level of 14, nearly as bright as a torch or lantern.
They grow naturally on glow berry vines, which spawn exclusively in lush caves and similar biomes. Players can harvest individual berries or entire vine structures. The beauty of glow berries is their versatility: you can eat them for modest hunger restoration, use them as a renewable light source, decorate with them, or breed animals. In a survival world, having a glow berry farm eliminates the need for constant torch crafting, especially in deep exploration runs where you’re mapping out cave systems.
One thing to note: glow berries are food, not blocks. You can’t place them directly in the world: they’re always attached to vines. This distinction matters when planning your farm layout.
Where to Find Glow Berries
Exploring Caves and Lush Caves Biomes
Glow berries spawn naturally in lush caves, the verdant cavern biome introduced in 1.17. Lush caves are packed with vegetation: azalea trees, moss, vines, and of course, glow berry vines dripping from the ceiling. The easiest way to spot them is to look up, glow berries hang from the cave roof and emit that signature greenish-yellow glow.
Not all caves have lush biomes, so you might need to explore a bit. Lush caves typically generate below y-level 0, often nestled between dripstone caves and deep dark biomes. If you’re mining down around y=-40 to y=-50, you’re in prime hunting territory. The glow is usually visible from a distance, so scan your surroundings carefully. Bring some blocks and a way to climb, you’ll likely need to build up to reach the vines hanging overhead.
Once you spot a lush cave, you’re golden. Many players find multiple vine clusters in a single cave system, so one exploration run can net you dozens of berries and enough vine segments to start a farm.
Using Creative Mode to Locate Them
If you’re playing on a multiplayer server or just want to speed up the process, Creative mode is your friend. Switch to Creative, type /locate biome minecraft:lush_caves in the chat, and the game will give you coordinates to the nearest lush cave. Teleport there with /tp, and you’ve eliminated the randomness entirely.
This approach is especially useful if you’re setting up a new world and want to prioritize glow berry farming from the start. It’s not cheating in the traditional sense, it’s just skipping the RNG lottery. Many serious builders and farmers use this method to bootstrap their resource chains.
How to Harvest and Collect Glow Berries
Breaking Glow Berry Vines
Harvesting glow berries is simple: approach the vine and right-click (or press the use key on your platform). Each vine block will drop one glow berry item. Break the vine block itself and you’ll get the vine as a block (which you’ll need for farming). If you break the vine without harvesting the berry first, you’ll still get the berry drop, so don’t stress about the order.
You don’t need special tools, your bare hand works fine. No pickaxe, no shears, nothing fancy. A full stack of glow berries takes up one inventory slot, so you can carry up to 64 at a time.
One pro tip: glow berry vines can be quite long, with multiple berry nodes along a single vine. Clear the entire vine structure if you’re planning to farm, you want those vine blocks to rebuild on your farm. Vines will regrow berries over time in the right conditions, so stripping a cave doesn’t permanently deplete it.
Farming Glow Berries for Infinite Supply
Farming glow berries is where the real efficiency gains happen. Unlike hunting in caves, a proper farm gives you a predictable, renewable supply. The process isn’t complicated, but it does require some setup.
Grow glow berries on cave vines, which you’ve harvested from the wild. Vines grow downward naturally (they hang from a ceiling block), and new berries appear on the vine after a short growth cycle. The growth happens on random ticks, similar to sugar cane or bamboo, so it’s not instant, but it’s reliable.
The key is hydration and lighting. Glow berry vines don’t need water directly, but they do need to be within hydration range of water (up to 4 blocks horizontally, 1 block down). They also need adequate light to grow, though they don’t require sunlight specifically. Artificial light works fine, even the glow berries themselves provide enough light if arranged correctly.
A basic setup: place water on the ground, attach cave vine blocks to a ceiling structure, and let gravity do the work. Berries will spawn and grow downward. Check back after a few in-game days, and you’ll have a productive farm generating food and light simultaneously. For large-scale farming, build your vines in rows with water channels between them. The more vines you have, the more berries you’ll harvest per cycle.
Uses and Benefits of Glow Berries
Food and Hunger Restoration
Glow berries restore 0.5 hunger points each, or one-quarter of what a cooked porkchop gives you. From a pure nutrition standpoint, they’re not going to sustain you in a long fight or mining session. You’d need to eat eight glow berries to equal a single cooked meat item. That said, they’re better than nothing, and in a pinch, especially early game, they keep you alive.
Their real food value lies in abundance. Because they’re easy to farm and grow relatively quickly, you can keep a stack of 64 in your hotbar without guilt. They pair well with better food sources: use them to top off your hunger bar between encounters. Some players also stockpile them for long expeditions into the nether or end, where you can’t cook or farm.
Decorative and Building Purposes
This is where glow berries truly shine. Architects and builders love them because they’re both functional and beautiful. A single glow berry provides ambient lighting that looks organic, way better than a row of torches or lanterns. Many builders use glow berry vines as living decoration, draping them down walls, creating cave-like environments, or framing doorways.
They work especially well in fantasy builds, enchanted forests, or any structure trying to evoke a natural cavern aesthetic. The light they emit has a warm, greenish tone that’s unique in Minecraft. You can’t replicate that vibe with typical light sources.
Their vine structure also allows for creative building. Long vines can be shaped (vines grow downward from a support block), so you can create cascading walls of glowing foliage. Many showcase builds on IGN and gaming forums feature glow berry setups as key visual elements.
Breeding and Feeding Animals
Glow berries cannot be used to breed animals. Let’s be clear on that, they’re strictly food for the player. Animals like horses, llamas, and other mobs have their own preferred foods (apples for horses, hay bales for llamas, etc.), and glow berries don’t trigger breeding on any mob.
That said, they are harmless to have around animals. If you’re taming or managing livestock near your glow berry farm, there’s no risk of accidental breeding from the berries themselves. The main reason to keep a glow berry stockpile isn’t animal husbandry, it’s personal sustenance and light.
Some players do incorporate glow berry farms into larger complex farms that also include animal breeding areas, just for efficiency. It looks cohesive, and you’re maintaining everything in one location.
Glow Berry Farm Setup Guide
Choosing the Right Location
Location matters more than you’d think. Ideally, you want your glow berry farm underground, this serves dual purposes. First, underground farms reduce lag because the vines won’t be affected by sunlight cycles or sky light calculations. Second, they fit thematically: glow berries are cave plants, so a cave-based farm feels authentic and integrates well with exploration networks.
That said, glow berries can be farmed anywhere, even on the surface. What matters is having:
- Water access (within 4 blocks horizontally, 1 block down)
- Adequate lighting (any light source works: the berries’ own glow counts)
- Enough height (vines hang downward, so you need vertical space for them to grow)
- Protection from mobs (optional, but prevents accidental damage)
Many players carve out a dedicated chamber near their main base, even if it’s not a natural cave. This gives you quick access without long travel times. A simple 10×10 or 15×15 room is plenty for a mid-game farm that produces more berries than you’ll ever need.
Building and Growing Your Farm
Here’s a straightforward step-by-step setup:
-
Dig or designate your farm area. Pick a spot with sufficient vertical clearance, at least 8-10 blocks tall to give the vines room to grow downward.
-
Build ceiling support. Place full blocks (stone, deepslate, etc.) across the top of your farm. This is where you’ll attach vines.
-
Place water channels. Run water down the sides or through the middle of your farm, ensuring all vine columns are within 4 blocks of water (horizontally). You don’t need water to touch the vines: proximity counts.
-
Attach cave vine blocks. Right-click (use) a full block with a cave vine item in your hand, and the vine will attach to that block. Vines grow downward from their attachment point, so place them on your ceiling supports.
-
Add lighting. Hang torches, lanterns, or glow lichen around the farm, or let the growing berries provide light over time. Light level 9+ is ideal for consistent growth.
-
Wait and harvest. Berries will begin appearing on the vines within a few in-game days. Harvest by hand (right-click), and leave the vine blocks intact so they regrow.
For optimization, space your vine columns about 6 blocks apart horizontally. This prevents vine overlap and ensures each column has clear water access. A 15×15 chamber with 9 vine columns (3×3 spacing) will produce dozens of berries per harvest cycle.
Advanced players often incorporate hoppers and collection systems to auto-harvest berries and funnel them into storage. This requires sticky pistons and redstone contraptions, but the payoff is a fully automated farm that requires zero manual harvesting.
Tips and Tricks for Glow Berry Success
Growth Rates and Optimization
Glow berries grow on random ticks, just like most crops in Minecraft. Each game day (20 minutes of real time), the game generates random ticks in chunks you’re in. With enough light and water, each vine block has a decent chance of spawning a new berry per tick.
To speed up your farm, spend time near it. The closer you are to your farm, the more random ticks it receives. If you’re building a farm you plan to use heavily, locate it near your main base or AFK area. Some players even set up auto-farm contraptions nearby to keep chunks loaded, ensuring constant growth ticks whether they’re actively playing or not.
Bone meal does not accelerate glow berry growth, unlike crops, vines don’t respond to it. So don’t waste bone meal on your farm. What does help: ensuring your light levels are maxed (15 is ideal), keeping water sources clean and accessible, and having plenty of vine blocks. More vine blocks = more opportunities for berries to spawn.
Another trick: glow berries grow downward from the attachment point. If you want to maximize vertical growth in a limited space, space your ceiling supports 2-3 blocks apart and let the vines cascade down in long chains. A single attachment point can yield 8-10 berries in a column if given space.
Combat and Survival Uses
While glow berries are modest food, they have a niche in survival situations. Early game, before you’ve hunted livestock or built a farm, glow berries from lush caves are a legitimate food source. They’re better than nothing when you’re exploring at low health.
In the late game, their real value is lighting during combat or risky exploration. Carrying a pickaxe and a stack of glow berries means you can navigate dark caves safely while maintaining inventory space for loot. The berries light your path and sustain you if things go sideways.
Some speedrunners and hardcore players swear by glow berry farms because they eliminate a bottleneck: you never have to choose between hunger and torch placement. You eat a berry, the light follows you, problem solved. In high-stress situations, like navigating a deep dark or fighting the Warden, that kind of redundancy is clutch.
For boss fights (Ender Dragon, Wither), glow berries won’t be your primary food: you’ll want better nutrition. But as a backup food source, they’re never a bad call. Keep a stack in your ender chest for peace of mind.
Glow Berries vs Other Light Sources
Minecraft has plenty of light sources, and understanding where glow berries fit is key to using them effectively.
Torches and Lanterns: These are the gold standard for early-game lighting. They’re easy to craft and fast to place. But, they clutter the landscape and don’t serve double duty. Glow berries, by contrast, look organic and provide food. In purely aesthetic builds, especially those mimicking natural caves, glow berries win. In utilitarian cave networks where you just need light fast, torches are more efficient.
Glowstone and Glow Lichen: These emit light levels 15 and 14, respectively, equal to or near glow berries. But they require mining (Nether for glowstone, underground for glow lichen) and don’t provide food. Glowstone is useful in tech and modern builds, but it lacks the natural aesthetic glow berries bring. According to resources like GameSpot, building guides consistently praise glow berries for their unique visual balance.
Amethyst Spikes and Sculk Sensors: These are niche. Amethyst spikes emit light level 7, dimmer than glow berries. Sculk sensors are functional but not intended as primary light sources. Neither serves the dual-purpose role glow berries nail.
Redstone Lamps: These are toggleable and bright, but they require complex wiring and power. For simple, passive lighting, glow berries are far simpler.
The verdict: If you’re building something with a natural, cave-like aesthetic and want both light and food, glow berries are unmatched. If you’re prioritizing speed or modern architecture, other sources might suit you better. Many experienced builders use a mix, glow berries for atmosphere, torches for functional lighting in work areas, and other sources for specific aesthetic needs. Think of glow berries as a specialist tool rather than a universal replacement.
For in-depth comparisons and placement strategies, guides on Twinfinite often jump into build-specific recommendations, and you’ll see glow berries featured prominently in aesthetic-focused content. They’re also worth considering if you’re experimenting with Minecraft Candy or other decorative food items for themed worlds.
Conclusion
Glow berries are a surprisingly versatile addition to any Minecraft world. Whether you’re after a practical food source, an elegant light solution, or both, they deliver. The process of finding them in lush caves, harvesting the vines, and setting up a renewable farm is straightforward enough for beginners yet rewarding enough to optimize for efficiency players.
The key takeaways: locate lush caves deep underground, strip the vines carefully for both berries and blocks, and set up a simple farm with water and light. Once it’s running, you’ll have a consistent supply of light and food without the micromanagement of other farming systems.
In 2026, with Minecraft’s continued evolution and community-driven building trends, glow berries remain one of the best investments you can make early in a survival world. They scale with your base complexity, from a simple survival cache to an elaborate decorative showcase, and they solve multiple problems at once. If you haven’t incorporated them into your world yet, it’s worth the cave dive to grab some vines and get started.
More Stories
Mastering Command Blocks In Minecraft: The Complete 2026 Guide
How Does Mending Work in Minecraft? A Complete Guide to Repairing Your Gear in 2026
How To Build The Ultimate Mob Farm In Minecraft: Complete Guide For 2026